Waterproof Swimming Tote
Hi everyone!
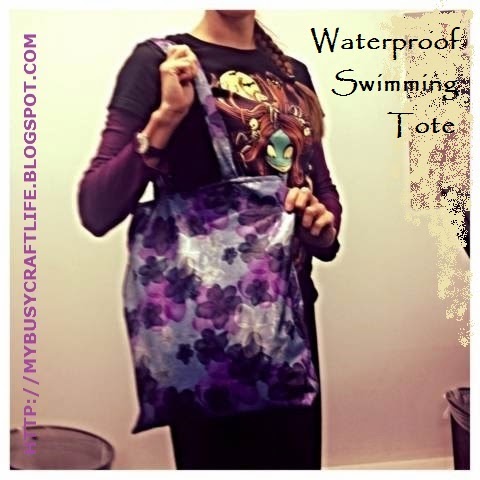
I've been going for a weekly swim for a while now, and every time I carried my stuff home, everything was wet from the towel and the suit. Surely there had to be a better way to carry everything home without soaking the rest? Then I had the answer: waterproof fabric! You know, that kind of laminated fabric you can find these days that is kind of plastic-y? So I brought a friend and went on the hunt for the laminated fabric. We found some, but the prints were awful, very flowery and not in the right colours.
However, on the way back from the show, we stopped for tea at my friend's house and he showed me some fabrics he wasn't using anymore and if I wanted any of them. Lo' and behold: raincoat fabric! It was perfect :) Not only would it be waterproof, it also had big purple flowers on it, I was instantly hooked. So I took the cutoffs home and got started. Are you curious yet? Oh alright, I'll show you the result:
Not a great pic but this was first use, I was so pleased!
I used an existing tote bag as a template for size, but rather than
having it completely flat as most tote bags are, I made the bottom
square so that my towel and slippers would snuggly fit. The straps are just tubes with leftover cord inside for extra strength.
My tote bag has a divided pocket. I basically sewed two pieces together (my pieces weren't big enough that I could just fold on piece) and with the right side out left it on top of the wrong side of the tote bag as I sewed that right sides together. Then, when I turned the bag the right side round, the flowers were on the outside, and the divider inside. Yes, it took a while for me to get my head around it but I'm happy to say that it worked the first time! No unpicking for this lady for a change :)
I also used some magnetic buttons (in purple, they match!) so I'd be able to close the bag properly. Now THIS part I had to redo a bit. You can see there are two stitch lines. Basically, what I'd done it sew the sides together but not the bottom half of this extra bit that had the button, which meant that it was constantly kind of open. Really annoying. And the sewing on the top inside wasn't great, to I took that part out, sewed the top edge down properly, and now it's perfect :)
Funnily enough, when my friend saw it, his first response was: the water proof bit is on the outside!' which makes sense for me because the outside needs to be dry so that I can put the bag everywhere without making a mess. And surely it won't leak through. It hasn't yet anyway!
On a side note, I have a small tip: as I'm sure most of you do, I have been rolling my wet bathing suit into my towel for years. You then put the towel in your bag and head home. Sound familiar? As you also dry yourself with said towel and you have now added your wet bathing suit, chances are (more likely than not) that everything in your bag will be damp to say the least. Your bathing suit has soaked into your already partially wet towel and there is just no stopping. This may be obvious for some, but I have taken to putting my bathing suit in my swimming hat. The towel is usually only a little bit damp and will be fine, it's the suit that ruins everyhing! So put the wet bathing suit into the swimming hat (which is plastic and therefore waterproof) and put the swimming hat into the bag. Stay away from the towel! Once you're home, you will see there is now minimal flooding in your bag :)


Comments
Post a Comment
Leave a comment, make my day!